

The Blue Devil!
A good friend of mine recently bought a new (to her) bike. It fit's great for her rather short size and is in pretty decent condition. A few spots of scratched/rubbed off paint, grime in the normal places like the gears, chain, underbelly, but good shape for the price and age of the beast. So what was the problem then? The freewheel wobbled like "whoa!" and every revolution of the rear wheel brought a strange "swoosh" noise.
"Interesting! Doctor let's operate!"
(I must apologize before hand, I didn't have my camera for all of this project! Sorry!)
First things first: get that rear wheel off the bike. No problem so far, just undid the quick release and pulled the wheel off. I should probably say that I had never taken a freewheel (the bundle of gears on the rear of a bike) apart before. How hard could it be? Plus I had my ever-handy and completely necessary "Everybody's Bike Book." I would be pretty lost without this gem. So I started taking this thing apart and laying all the nuts, washers, doodads, and diddles into separate egg carton compartments which is very handy for keeping track of parts.


Everything was going fine until I tried to take the actually freewheel off.
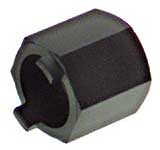
"My tool won't fit in the slot!"
(I said that!)

It's hard to tell unless you know what you're looking at, but there are three slots in a Y formation on the inner most ring of the copper color metal. A tool is supposed to fit into those slots and rotate the entire piece to loosen and take off the freewheel. There are two common types of free pullers: a splined puller and a two pronged puller. This little blue devil requires a THREE pronged puller (I couldn't even find a picture of one!) I don't have a three pronged puller! So I took the wheel down to Marty's Bike shop in Stow. The technician down at Marty's was shocked to see such a thing. He said he had heard of the three prong type, but never had he seen one and nor had he ever worked on one. He began digging through boxes and tool behind the counter. "I think I have the tool. I saw it not too long ago and thoughts 'I should probably keep this thing just in case i ever have to use it.'" Good thing he kept it or I'd be up a tree with a bear! I ended up leaving the wheel with him over night. I picked it up and, voilà! The freewheel was off!

The freewheel was off and damn it was dirty! Look at this thing! Look at that grimy grease!


The second picture there is what was under the freewheel. That pit of black/brown grime is where the bearings (little metal balls that allow the metal to glide) are supposed to go. How can anything work as designed in such conditions! Clean up was simple enough though. Some paper towels and a lot of wiping did the trick. (Sorry, there are no pictures of the dust shield and bearing cup cleaned up prior to reassembly!!) I must say that the clean up of old parts can be very enjoyable. Removing years upon years of dirt and bringing that old part back into use is a great thing. So after the bearing area was cleaned up I put on some gloves, brought out the synthetic grease and lubed up . . . the bearing cup! (I know what you were thinking, sick!) I also bought new bearings at Marty's, and I just stuck those into the grease and tapped the dust shield on with a hammer. After that I simple screwed the freewheel back on, lucky for me there is no special tool needed to put the freewheel back on. Just make sure you don't cross thread when reassembling. You could messed things up in a bad way.
BAM! That looks nice!


The next thing to do was put the axle back together and put it through the center of the wheel. I should have taken a picture of the axle as I did my work but I didn't because of the chance of grease getting onto the camera as I put my fingers around the greasy bearing area. Forgive me. So to make up for it, and to give you an idea of what I'm talking about, here is an image I yoinked from www.sheldonbrown.com which I should mention, is a good source of bicycle knowledge. Some of the writing should be taken with a grain of salt, however. Anywhoo! This is a typical bicycle axle:

The only difference I can see is that the dust caps on this Blue Devil aren't attached to the axle, but instead are pressed into the wheel itself. I assembled the right side of the axle, cone against the bearings, washers, and tightening nut. Then I put the left end first through the center of the wheel, coming out through the freewheel, like this:

After the axle was through the wheel the rest of the components slipped/screwed on easy; cone, spacers, washer, locking nut. I screwed the cones on tight against the bearings, then back them off a half turn. You want the cones to be securely holding the bearings, but also allowing them to spin, so the wheel can spin. Also one thing that needs to be taken into account is making sure that there is even amounts of threads exposed on either side of the wheel. These threads are what is going to be locked against the frame, holding the wheel in place with the frame as it spins. Very important! The easiest way is to just count the number of threads on each side.

I tested the wheel by holding the axle on both sides and spinning the wheel along the floor and holding the wheel in the air. It spun smoothly without much resistance: great! The wheel was ready to go back onto the bike at this point. Little did I know that most fun was in store for me . . . the Blue Devil has more tricks! More to come, so stop back soon!
